 |
| Garden Fairy ©Shannon Wasilieff 2015 |
Showing posts with label Pattern. Show all posts
Showing posts with label Pattern. Show all posts
Saturday, 6 June 2015
The Garden Fairy
With a little down time this month I have been able to work on a new pattern for my Etsy shop! We bought a bunch of flowers a few weeks ago and it inspired this idea for a garden fairy who prances around the garden planting flowers and seeds.
She is full of beads and has hints of Kreinik #4 braid in her. She will definitely glisten and dance in the light. I am going to stitch her on Aerial by Picture This Plus.


Monday, 16 March 2015
Carousel Horse Cross Stitch Designs
These beautiful carousel horse cross stitch designs are currently available in issue 227 of The World of Cross Stitching. They contain some Kreinik #4 braid that adds some sparkle to the designs. Some people have exchanged the Kreinik French knots with beads and they look equally as stunning. I have seen a few stitched on hand dyed fabric and that just adds an even more whimsical feeling to them.
There are 6 different designs. I think they would look gorgeous stitched together and made into a wall hanging quilt. Or you could flip 3 of them so they are all going the same way and stitch them in a long strip and make it into a 3D decorative pillow or put them around a round box.
 |
| (c) The World of Cross Stitching issue 227, 2015 Designed by (c) Shannon Wasilieff |
 |
| The World of Cross Stitching issue 227, Designed by (c) Shannon Wasilieff, 2015 |
Thursday, 23 October 2014
Sneak Peek!
Hey all!
Sorry I haven't posted in a while. I have been working on some commissions and even stitching them so obviously I can't show you them until they are published. The Cookie Sampler which I showed you guys a few months back will finally be in issue 223 of The World of Cross Stitching on sale November 6, 2014!
Since I can't show you my commissions I will let you in on my latest project. Currently I am designing and stitching a bunch of cross stitch designs to combine together to create a book. Once all of the models are stitched and finished off I will put my photography knowledge to work with a good camera and good lighting. When done, I will approach a few publishing houses with it or self publish it myself as an e-book and hard cover. Here is a little sneak peek at one of the many designs:

The colours are inspired by a vintage Christmas card I saw and I have to tell you it is stunning in person! I think I might have found a new colour pallet to work with in the future.
Sorry I haven't posted in a while. I have been working on some commissions and even stitching them so obviously I can't show you them until they are published. The Cookie Sampler which I showed you guys a few months back will finally be in issue 223 of The World of Cross Stitching on sale November 6, 2014!
Since I can't show you my commissions I will let you in on my latest project. Currently I am designing and stitching a bunch of cross stitch designs to combine together to create a book. Once all of the models are stitched and finished off I will put my photography knowledge to work with a good camera and good lighting. When done, I will approach a few publishing houses with it or self publish it myself as an e-book and hard cover. Here is a little sneak peek at one of the many designs:
The colours are inspired by a vintage Christmas card I saw and I have to tell you it is stunning in person! I think I might have found a new colour pallet to work with in the future.
Monday, 30 September 2013
Section #4 September Free Stitch Along
Hi everyone, sorry for the week delay of the 4th section of the stitch along. I can't believe how exhausting it is taking care of a cat and kittens. We ended up finding a foster home for them where they will all get fixed, vaccinated and good homes to go to. On to the final section of the SAL now!

Each specialty stitch is done using 2 threads. The grid lines in the following diagrams represent the threads of your fabric.
 For the eyelet sections of this project you will bring your needle up through the odd numbered holes and down through the middle for every even hole then up through the next odd. Pull tight to achieve a hole to create your eyelet.
 For this satin stitch bring your needle up through 1 and down through 2 then up through 3 and down through 4. Continue until you have done all five lines.
 To create the leaf you are going to bring your needle up through 2 and down through 1 then up through 2 and down through 3 then up through 2 and down through 5 and continue this until you have created your leaf.
 For the fan leaf you will bring your needle up through 1 and down through 2 then up through 1 and down through 4 then up through 1 and down through 6. Continue this until you have finished the fan shape.
 For the straight petals go up through 1 then down through 2 then up through 3 and down through 4 until you have finished the petal. Continue until you have done all 4.
 For the diagonal petal go up through 1 and down through 2 then up through 3 and down through 4. Continue until your done the whole petal. Do three more.

Each specialty stitch is done using 2 threads. The grid lines in the following diagrams represent the threads of your fabric.
Monday, 16 September 2013
September SAL Section #3
It is time for the third instalment of the September Free Stitch Along!

If you were able to do section #2, section #3 should be easy for you. It is a variation of the Satin Stitch, just now creating texture and a different shape.
*Remember for the diagrams below, each line represents a thread of your fabric, and all stitching is done using 2 threads.*
Leaf Corners:
 Bring the needle up through 2 and down 1 then up 2 and down 3. Then bring needle up 5 and down 4 then up 5 and down 6. Then up through 8 down 7 up 8 and then down 9. Bring your needle up 10 and then down 2 to create the stem. Rotate diagram and repeat steps to do the other two leaves in each corner and finish off with a French knot.
Acorns:
 Basic cross stitch 3 stitches then bring the needle up through 1, down through 2, up through 3, down through 4 and so on until you finish up through 9 and down through 10. Finish off with a French knot on top then move onto the next acorn.
Leaf Sides:

Bring needle up through 1 down through 2 then up through 1 and down through 3. Move one thread down and repeat the same and continue doing this until you reach the bottom. Flip the diagram upside down to create the upwards stitch.

If you were able to do section #2, section #3 should be easy for you. It is a variation of the Satin Stitch, just now creating texture and a different shape.
*Remember for the diagrams below, each line represents a thread of your fabric, and all stitching is done using 2 threads.*
Leaf Corners:
Acorns:
Leaf Sides:
Bring needle up through 1 down through 2 then up through 1 and down through 3. Move one thread down and repeat the same and continue doing this until you reach the bottom. Flip the diagram upside down to create the upwards stitch.
Thursday, 27 June 2013
French Princess Shoes
Here is a little sneak peak at my latest cross stitch design.
 Twelve Princess shoes sit on the gold and jewel adorned shelf waiting to be worn. The pattern was designed with my love of the Brother's Grimm Fairytale "The Twelve Dancing Princesses" in mind. In the cross stitch pattern I have incorporated beads and Krienik to add small details to the French inspired princess shoes.
Along with this bigger project, a bell pull pattern and a small gift tag pattern are also available.
Bell Pull:
 Gift Tag:

These patterns are for a more advanced stitcher or someone looking for more of a challenge. Quarter stitches and color changes are used to create the gold framework and the shoes of each pattern. The patterns will be available in the next couple of days and can be found on my Etsy site.

Along with this bigger project, a bell pull pattern and a small gift tag pattern are also available.
Bell Pull:

These patterns are for a more advanced stitcher or someone looking for more of a challenge. Quarter stitches and color changes are used to create the gold framework and the shoes of each pattern. The patterns will be available in the next couple of days and can be found on my Etsy site.
Saturday, 30 June 2012
Little Drummer Boy
An opportunity and a new challenge presented itself to me yesterday afternoon. I offered to design a little drummer boy for a customer who was having difficulties finding a detailed cross stitch pattern. She said that she had looked everywhere and the only ones she came across were the quick 2 hour projects, and that just wasn't going to do! I was happy to design her a little drummer boy, not only for her but for others who are having difficulty finding something more advanced!
Here is the little cutie:
He is designed using 20 colors of DMC and measures 45 stitches wide by 79 stitches tall. And surprisingly there is no sparkles in him! Which is unusual for my designs but I think he is going to look just as good stitched up and the sparkles would have over powered such a small design. There are a few quarter stitches in him but that was unavoidable due to the scale of the design and wanting to get his delicate tiny hands and nose perfect without them becoming blocky. Back stitching was also used to help create details such as the hair poking out from his head dress and the rope details on his belt.
Some of you may notice the the antique mauve and pine green combination are one of my favorites to work with! I wanted to give it more of an antiqued look and what better way to do that than using dusty colors?
Here is the little cutie:
 |
| The Little Drummer Boy by Lasting Allure |
Some of you may notice the the antique mauve and pine green combination are one of my favorites to work with! I wanted to give it more of an antiqued look and what better way to do that than using dusty colors?
Wednesday, 27 June 2012
New Collaboration and Update on Marie!
Sorry for such the delay in between posts! I meant to post last week but plans had changed abruptly and I ended up leaving a couple days sooner than planned to go house and dog sit for the week. Once I got to the house though I barely had access to the internet so instead of playing with the router all night and day I decided to be a bit more productive!
I am happy to announce an experimental collaboration with artist Janna Prosvirina. She works mainly in watercolor and focuses on fairies and fantasy art. You can find her artwork here. Her work is beautiful and I am glad she has agreed to work with me in creating gorgeous advanced cross stitch patterns! She herself used to cross stitch as well and has approved the layout of the patterns and is happy with the professional look I have come up with for the patterns. Here is a small taste of the designs I now offer. You can find four other designs plus the following ones for sale at http://www.etsy.com/shop/LastingAllure
Along with the addition of these patterns I also managed to get a potion of Marie Antoinette done.

I just have a small section of the pink to complete and then I can move onto the blue of her skirt. I am really looking forward to getting the dress all complete and getting all the beads onto her! She is just going to be stunning.
I hope everyone is doing well! I am going to go look at everyone's blogs now to get caught up on everyone else's projects! Happy stitching everyone! :)
Shannon
I am happy to announce an experimental collaboration with artist Janna Prosvirina. She works mainly in watercolor and focuses on fairies and fantasy art. You can find her artwork here. Her work is beautiful and I am glad she has agreed to work with me in creating gorgeous advanced cross stitch patterns! She herself used to cross stitch as well and has approved the layout of the patterns and is happy with the professional look I have come up with for the patterns. Here is a small taste of the designs I now offer. You can find four other designs plus the following ones for sale at http://www.etsy.com/shop/LastingAllure
 |
| Midnight Masquerade |
 |
| Summer Moon |
 | |||
| Fly With Me |
Along with the addition of these patterns I also managed to get a potion of Marie Antoinette done.
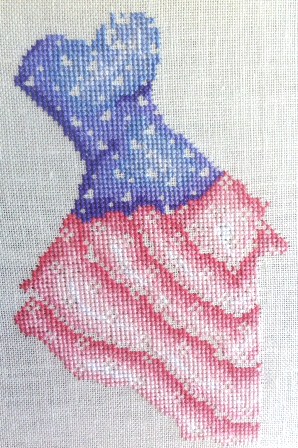
I just have a small section of the pink to complete and then I can move onto the blue of her skirt. I am really looking forward to getting the dress all complete and getting all the beads onto her! She is just going to be stunning.
I hope everyone is doing well! I am going to go look at everyone's blogs now to get caught up on everyone else's projects! Happy stitching everyone! :)
Shannon
Sunday, 25 March 2012
Pink Cupcake Cross Stitch Motif
It is about time I put up another free cross stitch pattern. This time its a tiny little pink cupcake motif with a delicious cherry on top and adorned with red sprinkles. The icing is a baby pink and looks so good you could just eat it! Perfect for a birthday card or for a lid to a special container.
 This pattern is for personal use only and cannot be made into kits or sold. To save click on the picture and then right click and hit save. Happy Stitching everyone!


Saturday, 28 January 2012
Cross Stitch Red Rose Small
With Valentines Day around the corner I decided I will share with my readers a free cross stitch pattern that I designed. It would look amazing as a Valentines Day card for a special someone or even as a small decoration for your room! Hope you all enjoy. I would love to see finished projects especially if you came up with a new idea for it. Here is what it should look like when finished:
 Here is the pattern. Click on it to enlarge then right click and hit save:


Friday, 16 September 2011
Update time!
Wow sure has been a while since I last posted. I have been super busy with moving to a new town and getting organized and back into the swing of things! Moving isn't easy and doesn't allow a lot of down time or creative time. Over the past month or so I have been able to get a few things done though and I wanted to share how much I have done.
This is the progress I have gotten on my Christmas Angel by Joan Elliot:

She is coming along nicely. I spent a total of 4 days stitching the update in between organizing everything for the move and I think a couple more days of stitching she should be done! It is a pretty fast stitch if you are able to dedicate a couple days to it. I am just excited to start adding the beads! :D My goal is to finish her by late October...but we shall see how that comes along..I may get distracted once again!
Because of all the reds and greens in her I got a little bored. I kept messing up in areas so I had to put her away for a little while. I then decided to pick up my first ever project on linen that I started about 4 or so years ago. It is the Flower Faerie by Barbara Baatz. My mom has been on my case about completing her since it was one of those projects I HAD to start right away. So after unpacking I had found my mom bought all the missing threads so I didn't have an excuse to not finish her. This was how far I had gotten before I stopped for 3 years:

And after 2 days I was able to complete this much:

I have done a bit more since I took this picture, but not enough to post an update of it just yet. I love all the colours in her and she is going to look so beautiful when she is done.
 They are very blingy. I love how from afar they look as if they are high-end gem encrusted gold but when you look closer they are just made of beads! They are perfect for the party season that is approaching. If you are interested in purchasing them you can see if they are still available at: http://www.etsy.com/shop/LastingAllure
And one last thing I have been working on are my own cross stitch patterns from my paintings/drawings. I hope to have a pattern up for sale in the next month or so so please check back to see if my current project is up! I promise you it is very pretty and will have beads and sparkles!
For now though I must go do some chores so I can get back to being creative! Happy weekend everyone.
This is the progress I have gotten on my Christmas Angel by Joan Elliot:

She is coming along nicely. I spent a total of 4 days stitching the update in between organizing everything for the move and I think a couple more days of stitching she should be done! It is a pretty fast stitch if you are able to dedicate a couple days to it. I am just excited to start adding the beads! :D My goal is to finish her by late October...but we shall see how that comes along..I may get distracted once again!
Because of all the reds and greens in her I got a little bored. I kept messing up in areas so I had to put her away for a little while. I then decided to pick up my first ever project on linen that I started about 4 or so years ago. It is the Flower Faerie by Barbara Baatz. My mom has been on my case about completing her since it was one of those projects I HAD to start right away. So after unpacking I had found my mom bought all the missing threads so I didn't have an excuse to not finish her. This was how far I had gotten before I stopped for 3 years:

And after 2 days I was able to complete this much:

I have done a bit more since I took this picture, but not enough to post an update of it just yet. I love all the colours in her and she is going to look so beautiful when she is done.
I have a craft fair coming up at the end of November so I have also been working on new products to be sold there. I have been doing a lot of bead weaving lately and would like to share my newest additions to my collection.

And one last thing I have been working on are my own cross stitch patterns from my paintings/drawings. I hope to have a pattern up for sale in the next month or so so please check back to see if my current project is up! I promise you it is very pretty and will have beads and sparkles!
For now though I must go do some chores so I can get back to being creative! Happy weekend everyone.
Subscribe to:
Posts (Atom)